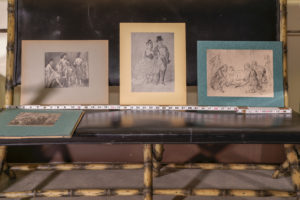
1. FINE ART:
A. How to photograph so an expert can see:
-
-
- P
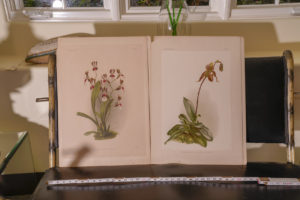 hotograph the entire piece with frame
 - Close up of “site” (just the image)
- Close up of signature and angled shot of signature
- Shot of back with any markings
- Shot of YOU measuring the piece
- P
-
º Image size only
º Size of entire piece
B. Characteristics; make notes on:
-
-
- A
 rtist
rtist - Date of creation
- Where “shown” or owned (provenance)
- Condition – front and back
- A
-
º Condition lighting: shine a flashlight to the angle of the side of an oil painting to show the raised brush strokes
-
-
- Size
- Genre (what style) especially if unsigned
- Multiple:
-
º If a lithograph, etching, engraving, silkscreen, serigraph, note “fraction” (edition number)
º If a print of any type, including a photo-mechanical reproduction (better known as a poster) note if the work is signed “in the plate” meaning if the reproduction INCLUDES the signature, or if it is signed with an original or perhaps double (both in the plate and on the piece by hand) signature.
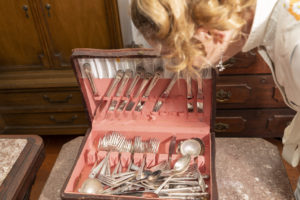
2. SILVER:
A. How to photograph so an expert can see:
-
-
 Silver reflects, so shoot with dark background
- Shoot close ups of hallmarks or any markings
- Shoot around areas where there may have been repairs (spouts, handles)
- Shoot any other material (glass, ivory, bone, wood) and how it is attached
- Be aware of color changes which may not come out in photos – gold is often applied to silver (vermielle)
-
B. Characteristics; make notes on:
-
-
- H
 allmark
 - Note if EPNS or “silver soldered;” this is not sterling
- Sterling or silverplate? Note the thickness of hollowware. Silverplate is often thicker and heavier than sterling
- Age
- Style (Nouveau is valuable, Rococo Revival less so)
- Famous makers (Tiffany) or retailed from famous shop (Liberty/Cartier)
- Weight in troy ounces
- H
-
3. GLASS DECORATIVE ITEMS AND TABLEWARE/BARWARE:
A. How to photograph so an expert can see:
-
-
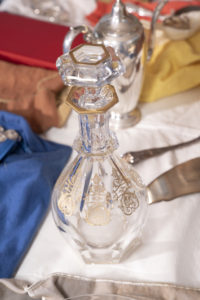 Cut glass versus pressed – hard to see in photos. Check sharpness of the “dentils:” the cuts, which are “sharp” in cut glass; use close up feature on camera
- Measurements, including diameter
- Shoot in great outdoor light
- Set closeup of the hallmark (which is often hard to find as they are not always on the bottom)
- Blown or machine made? (The three categories are blown, blown in a mold, and machine made.) Shoot a close up of bottom, there, look for these features:
-
º Pontil mark, which is where the glass blower would have attached his blow rod. These are sometimes ground down like an inverted saucer.
º Look for a signature; good modern glass is often signed.
º Look for a fraction or number. Fraction means a series (edition), a number may mean a style or model number.
B. Characteristics; make notes on:
-
-
 Sizes
Sizes- Color – check to see if the colors of the glass seem to be in “layers” (cased glass)
- Purpose – what was it used for? Art piece? Tableware?
- Age
- Maker
- Period/date
- Originality (Tiffany Favrile or Tiffany reproduction)
- Condition; extremely important, but hairline damage is hard to see, especially in photos
- Wear: on glass used often at table, you’ll see wear marks, which you should see if the piece is old and not a reproduction
-
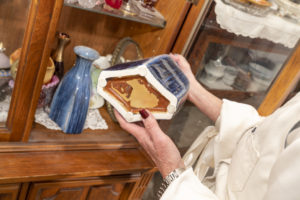
4. PORCELAIN and CERAMICS:
A. How to photograph so an expert can see:
-
-
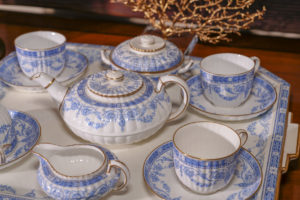 Shoot dimensions
- Condition – porcelain used at table shows knife marks, etc. Shoot TRACES OF WEAR with ‘raking’ light – light source like a flashlight held at an angle while shooting
- Repairs – on some old pieces a repair is acceptable and expected (Chinese Export porcelain, VERY OLD PIECES)
- Maker – or hallmark – or number – or signature of factory— shoot also all undersides, and geometrical markings, numbers, (model, edition, series) and dates
- Shoot closeup of decoration: hand-painted or hand-decorated design typically does NOT appear “deep under” the clear glaze
- Shoot whole set if there’s a set
-
B. Characteristics; make notes on:
-
-
- Se
 t, services
 - Color, glaze
- Condition, repairs
- “Foot” – is the bottom rim glazed? Do you see kiln marks?
- Signature, maker
- Style
- Age
- Shape
- Ethnicity
- Decoration or enameling or painting or gilding (gold, platinum, silver)
- Se
-
5. FURNITURE:
A. How to photograph so an expert can see:
-
-
 The whole piece front, back, bottom
- Special shots of “joins,” dovetails, applied “gingerbread,” backs of drawers where drawer pull holes are evident, hardware, hinges, locks, escutcheons, casters, feet, mullions on glazed doors, bottoms of drawers, one shot where “air” exposure over time has NOT occurred /such as a drawer liner (board between drawer bottom and drawer slot)
- Veneering, graining, a side shot of a veneered surface
- Crawl underneath and shoot up
- Labels, markings, numbers, any pencil marks
- Dimensions – shoot yourself measuring
-
B. Characteristics; make notes on:
-
-
- Age
- Style
- Craftsmanship
- Maker
- Use
- Ethnicity
- Rarity
- Added features (a dry bar for example)
 Carving, decoration, additional materials (copper embossed straps for example)
- Feet – wear and originality
- Condition
- Type of wood
- Refinished?
- Provenance
- Paint?
- Dust board on back, undersides
- “Plane” marks, measurement marks, type of glues, hardware, glazing
- Functionality
- Genre or period
- Geographical location
-
What are your tips for photographing and documenting jewelry?